How to Set Up Social Media Team Collaboration in SchedulifyX
SchedulifyX Team · July 6, 2026
Master social media team collaboration in SchedulifyX. Learn to set up brand workspaces, role-based permissions, and efficient content approval workflows.
Managing a brand's social media presence is rarely a solo endeavor. As your business grows, or as your marketing agency takes on more clients, the complexity of content creation, review, and publishing multiplies exponentially. Without a structured system, teams often find themselves drowning in endless email threads, chaotic Slack channels, and confusing spreadsheet content calendars. This is where mastering social media team collaboration becomes not just a luxury, but a fundamental necessity for survival and growth.
Welcome to the ultimate tutorial on leveraging SchedulifyX as your primary team scheduling tool. In this comprehensive guide, we will walk you through the exact steps to transform your chaotic content process into a streamlined, error-free machine. Whether you are an agency managing dozens of clients or an in-house team protecting a single global brand, the SchedulifyX team features are designed to bring harmony to your workflow.
We will cover everything from establishing isolated brand workspaces to configuring granular role-based permissions, and finally, setting up foolproof approval workflows that ensure no off-brand content ever sees the light of day. Grab a cup of coffee, open your SchedulifyX dashboard, and let's build a collaborative environment that empowers your team to do their best work.
The Importance of a Dedicated Team Scheduling Tool

Before diving into the technical setup, it is crucial to understand why a dedicated team scheduling tool is vital for modern marketing. In the early days of social media, a single person could log into Twitter, Facebook, and Instagram natively, post an update, and log out. Today, the landscape is vastly different. Audiences demand high-quality, platform-specific content delivered consistently across multiple channels.
When multiple people are involved—copywriters, graphic designers, video editors, legal reviewers, and social media managers—the risk of miscommunication skyrockets. Have you ever experienced a scenario where a draft was accidentally published before legal approval? Or perhaps a junior social media manager posted a meme that did not align with the company's brand voice? These mistakes can lead to PR nightmares, loss of follower trust, and significant financial repercussions.
A robust team scheduling tool like SchedulifyX mitigates these risks by centralizing the entire content lifecycle. It provides a single source of truth where ideas are born, drafted, reviewed, and scheduled. By implementing strict approval workflows and clear role-based permissions, you eliminate the guesswork. Everyone knows exactly what their responsibilities are, what stage a piece of content is in, and whose turn it is to take action. This not only protects the brand but also dramatically increases team efficiency and morale by removing administrative bottlenecks.
Step 1: Creating Brand Workspaces for Multi-Brand Management
The foundation of effective brand management in SchedulifyX begins with the concept of Brand Workspaces. If you are an agency managing multiple clients, or a parent company with several subsidiary brands, mixing all your social accounts into one dashboard is a recipe for disaster. Cross-posting to the wrong account is one of the most common and embarrassing mistakes a social media manager can make.
SchedulifyX solves this through isolated Brand Workspaces. A workspace is a dedicated environment containing its own social media accounts, content calendars, asset libraries, team members, and analytics. It acts as a digital walled garden, ensuring that content and data from Brand A never bleeds into Brand B.
How to Set Up a New Brand Workspace
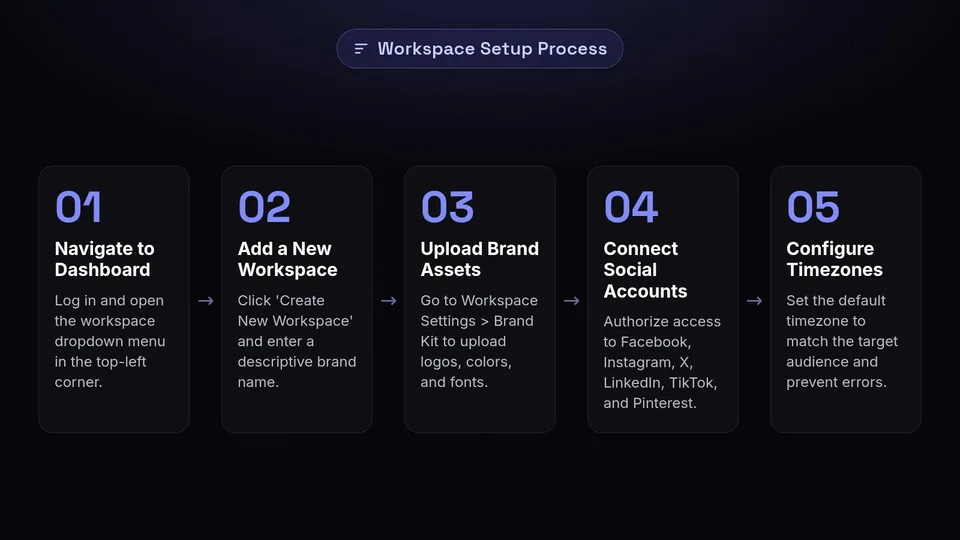
- Navigate to the Dashboard: Log in to your SchedulifyX account. In the top-left corner of your screen, click on the current workspace name to open the workspace dropdown menu.
- Add a New Workspace: Click on the Create New Workspace button. You will be prompted to enter the brand name. Be descriptive, especially if you manage regional variations of the same brand (e.g., 'Acme Corp - North America' vs 'Acme Corp - Europe').
- Upload Brand Assets: Once created, navigate to Workspace Settings > Brand Kit. Here, you should upload the brand's logos, color palettes, and custom fonts. This ensures that any content created within SchedulifyX's built-in image editor strictly adheres to the client's visual guidelines.
- Connect Social Accounts: Go to the Social Accounts tab within the new workspace. Click Connect Account and authorize SchedulifyX to access the brand's Facebook Pages, Instagram Business profiles, X (Twitter) handles, LinkedIn pages, TikTok accounts, and Pinterest boards.
- Configure Timezones: Do not forget to set the default timezone for the workspace. If your team is in New York but the brand targets an audience in Tokyo, setting the workspace timezone to JST (Japan Standard Time) will prevent massive scheduling errors.
By setting up distinct workspaces, you are laying the groundwork for secure, organized multi-brand management. Your team can seamlessly switch between clients without ever logging out, while maintaining absolute data integrity.
Step 2: Understanding Role-Based Permissions
With your workspaces established, the next critical step in social media team collaboration is defining who can do what. Giving every team member full administrative access is a dangerous practice. SchedulifyX offers highly granular role-based permissions designed to fit any organizational structure.
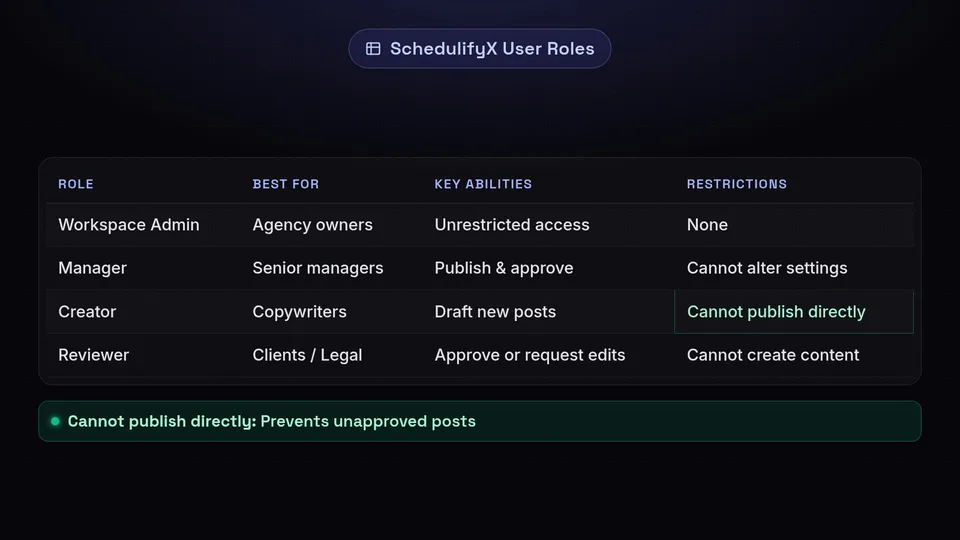
Understanding these roles is essential before you start inviting users. Let's break down the four primary roles available in the SchedulifyX team features suite:
1. Workspace Admin
The Admin is the highest level of authority within a specific workspace. They have unrestricted access to all features, settings, and data. Admins can connect or disconnect social media accounts, manage billing and subscriptions, delete the workspace, and invite or remove other team members. This role should be reserved for agency owners, department heads, or senior account directors.
2. Manager
The Manager role is perfect for senior social media managers or account leads. Managers can create, edit, approve, and publish content directly to the connected social accounts. They have access to all analytics and can view the entire content calendar. However, unlike Admins, Managers cannot alter critical workspace settings, access billing information, or delete social connections. They run the day-to-day operations without the risk of accidentally breaking the core setup.
3. Creator
The Creator role is where the magic of delegation happens. Creators are typically copywriters, junior social media executives, or freelance content creators. Users with this role can access the workspace, view the content calendar, and draft new posts. However, they cannot publish content directly to social media. Any post created by a Creator is automatically marked as a 'Draft' or 'Pending Approval'. This role ensures that fresh ideas constantly flow into the pipeline without bypassing quality control.
4. Reviewer
The Reviewer role is vital for stakeholders who need oversight but shouldn't be tinkering with content creation. This could be a client, a legal compliance officer, or a PR director. Reviewers can view posts that are pending approval. They can leave comments, request revisions, and ultimately approve or reject the content. They cannot create new posts from scratch or alter workspace settings. Providing clients with Reviewer access is a massive value-add for agencies, as it brings them directly into the platform, eliminating the need to send messy spreadsheets via email.
Step 3: Inviting Team Members and Assigning Roles
Now that you understand the hierarchy, it is time to bring your team into SchedulifyX. The platform makes it incredibly simple to onboard new users while maintaining strict security protocols.
The Invitation Process
To invite a team member, navigate to your desired workspace and click on Settings > Team Management. Here, you will see a list of all current users associated with the workspace.
- Click the Invite Member button in the top right corner.
- Enter the email address of the person you wish to invite. You can invite multiple people simultaneously by separating their email addresses with commas.
- Select the appropriate role from the dropdown menu (Admin, Manager, Creator, or Reviewer). Remember, you can change this role later if their responsibilities shift.
- Click Send Invitation.
The invited user will receive a branded email from SchedulifyX containing a secure, unique link to join the workspace. If they do not already have a SchedulifyX account, they will be prompted to create a free user profile. Until they accept the invitation, their status in your Team Management dashboard will display as Pending. You can resend or revoke invitations at any time.
Pro Tip for Agencies: When onboarding a new client, invite their primary point of contact as a Reviewer immediately. Send them a brief introductory email explaining that SchedulifyX will be the central hub for all content approvals. This sets a professional tone from day one and establishes clear boundaries for communication.
Step 4: Setting Up Content Approval Workflows
This is the core of effective social media team collaboration. Approval workflows are automated rules that dictate the journey a piece of content takes from initial conception to final publication. SchedulifyX allows you to build custom workflows tailored to the specific needs of each brand workspace.
Why Approval Workflows Matter
Without an enforced workflow, content collaboration relies on the honor system. A junior writer might think a post is 'good enough' and hit publish, completely bypassing the senior editor. Workflows remove the human error element. The software physically prevents unauthorized publishing, ensuring that every post meets your brand's quality and compliance standards.
How to Configure Workflows in SchedulifyX
SchedulifyX supports both simple and multi-tiered approval workflows. Let's look at how to set up a standard Agency-Client workflow.
- Access Workflow Settings: Go to Workspace Settings > Approval Workflows.
- Enable Workflows: Toggle the switch to 'Enable Mandatory Approvals'. Once enabled, users with the Creator role will lose the 'Schedule' button on the post composer; it will be replaced with a 'Submit for Review' button.
- Define the Steps: You can create sequential steps. For example:
- Step 1: Internal Review. When a Creator submits a post, it is routed to a Manager (e.g., the Agency Account Lead).
- Step 2: Client Review. Once the Manager approves the internal draft, the system automatically routes it to the Reviewer (e.g., the Client).
- Set Notification Preferences: SchedulifyX can alert Reviewers via email, in-app notifications, or even Slack integrations when a post requires their attention. Ensure these notifications are turned on so bottlenecks don't occur.
The Lifecycle of a Post in SchedulifyX
Let's walk through a practical scenario to see the workflow in action:
Sarah (a Creator) drafts a promotional post for a new product launch. She attaches an image, writes the caption, selects the target platforms, and chooses a proposed date and time. She clicks Submit for Review.
David (the Manager) receives a notification. He logs into SchedulifyX, reviews the post, and notices a typo in the caption. He uses the built-in commenting feature to tag Sarah: '@Sarah, please fix the spelling of 'exclusive' and re-submit.' He clicks Request Revision. The post is kicked back to Sarah's dashboard.
Sarah fixes the typo and resubmits. David reviews it again, is satisfied, and clicks Approve. Because this workspace has a two-tier workflow, the post is not scheduled yet. Instead, it moves to the Client's queue.
Elena (the Client / Reviewer) receives an email. She clicks the secure link, views the post exactly as it will appear on Instagram and LinkedIn, and clicks Final Approval. Only at this exact moment does SchedulifyX lock the post into the calendar and prepare it for automated publishing at the designated time.
This seamless process guarantees zero mistakes, total transparency, and a perfect audit trail of who approved what, and when.
Step 5: Collaboration Best Practices for Agencies and Brands
Technology is only as good as the processes behind it. While SchedulifyX provides the ultimate team scheduling tool, your team needs to adopt best practices to maximize its potential.
1. Utilize the Internal Commenting System
Keep conversations about content attached to the content itself. Instead of Slacking a colleague about a specific Facebook post, use the comment thread directly on the post draft in SchedulifyX. This keeps the context clear and creates a historical record of why certain creative decisions were made.
2. Build a Robust Asset Library
SchedulifyX features a shared Asset Library within each workspace. Encourage your design team to upload approved graphics, b-roll video clips, and templates directly into this library. When Creators are drafting posts, they can pull directly from this pre-approved pool of assets, ensuring brand consistency and saving time hunting for files in cloud drives.
3. Maintain a Living Content Calendar
Use the visual calendar view in SchedulifyX to plan campaigns weeks or months in advance. Utilize tags and color-coding to categorize content (e.g., green for educational posts, blue for promotional, red for company news). This gives Managers and Reviewers a bird's-eye view of the overall content strategy, making it easier to spot gaps or over-saturation of certain topics.
4. Establish Clear SLAs (Service Level Agreements)
If you implement approval workflows, you must establish response times. If a Creator submits a post for review on Monday, how long does the Manager have to review it? How long does the client have? Set clear expectations (e.g., 24-hour turnaround for approvals) to prevent time-sensitive posts from missing their scheduled slots.
Leveraging SchedulifyX Team Features for Scale
As your operations grow, the advanced SchedulifyX team features will become your secret weapon for scaling without adding proportional headcount. By mastering the basics of workspaces, roles, and workflows, you open the door to more sophisticated automation.
For instance, SchedulifyX's AI-powered content suggestions can be integrated into your collaboration flow. A Manager can generate a week's worth of AI prompts and assign them to a Creator as tasks. The Creator then fleshes out the AI drafts, adding the necessary human touch and brand voice, before pushing them through the approval pipeline.
Furthermore, analytics sharing is a massive component of team collaboration. Instead of manually building PDF reports at the end of the month, Managers can set up automated reporting dashboards within the workspace. Reviewers (clients) can log in at any time to view real-time performance metrics—likes, shares, engagement rates, and click-throughs—fostering a culture of transparency and data-driven decision-making.
Ultimately, brand management at scale requires trust, and trust is built on reliable systems. SchedulifyX provides the infrastructure to build that trust, whether you are coordinating a small team of three or a global enterprise marketing department of three hundred.
Conclusion
Effective social media team collaboration is the backbone of any successful modern marketing strategy. Relying on fragmented tools, endless email chains, and verbal approvals is a fast track to burnout and brand damage. By migrating your operations to a dedicated team scheduling tool like SchedulifyX, you take back control of your content lifecycle.
We have explored how creating isolated brand workspaces protects your clients' data and simplifies multi-brand management. We have broken down the importance of assigning precise Creator, Manager, and Reviewer roles to safeguard your social channels. Most importantly, we have detailed how to construct bulletproof approval workflows that guarantee quality, compliance, and peace of mind.
The transition to a structured, collaborative environment may require a brief period of adjustment for your team, but the long-term benefits—reduced stress, eliminated errors, happier clients, and higher quality content—are immeasurable.
Are you ready to transform the way your team works? Stop letting content chaos dictate your day. Start your free trial of SchedulifyX today and experience the power of seamless social media team collaboration for yourself. Empower your creators, streamline your approvals, and watch your brand's digital presence thrive.