How to Bulk Schedule Posts via CSV: Template, Preview & Fixes
SchedulifyX Team · September 7, 2026
Learn how to bulk schedule posts via CSV. Discover the essential steps from using the right template to previewing content and fixing rows in place.
Managing a consistent social media presence requires careful planning and execution. When you are tasked with filling a content calendar for weeks or months in advance, creating posts one by one within a user interface becomes highly inefficient. The most practical solution for scaling your content strategy is to bulk schedule posts csv. By leveraging a simple spreadsheet, you can draft, organise, and upload your entire content plan in a single action.
In this tutorial, we will explore the complete workflow for a successful bulk import. We will cover how to structure your data using the correct template, why the preview phase is a critical step in the process, and how SchedulifyX allows you to fix rows in place without needing to constantly re-upload your spreadsheet.
Understanding CSV Scheduling
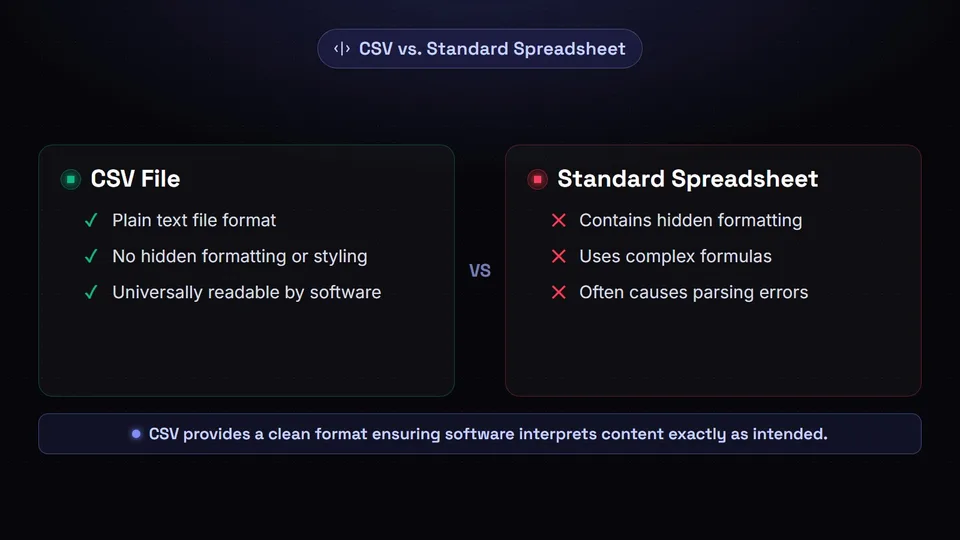
Before diving into the mechanics of the upload process, it is helpful to understand why csv scheduling is the industry standard. CSV stands for Comma-Separated Values. It is a plain text file format that uses commas to separate different fields of data. Because it contains no hidden formatting, styling, or complex formulas, it is universally readable by software applications.
When you bulk import social media content, the scheduling platform needs to parse your data accurately. It must determine which text is the post caption, which text represents the date and time, and which text is a URL. A CSV file provides a clean, stripped-down format that ensures the scheduling software interprets your content exactly as you intended, eliminating the errors often caused by hidden formatting in standard spreadsheet files.
Step 1: The Bulk Import Template
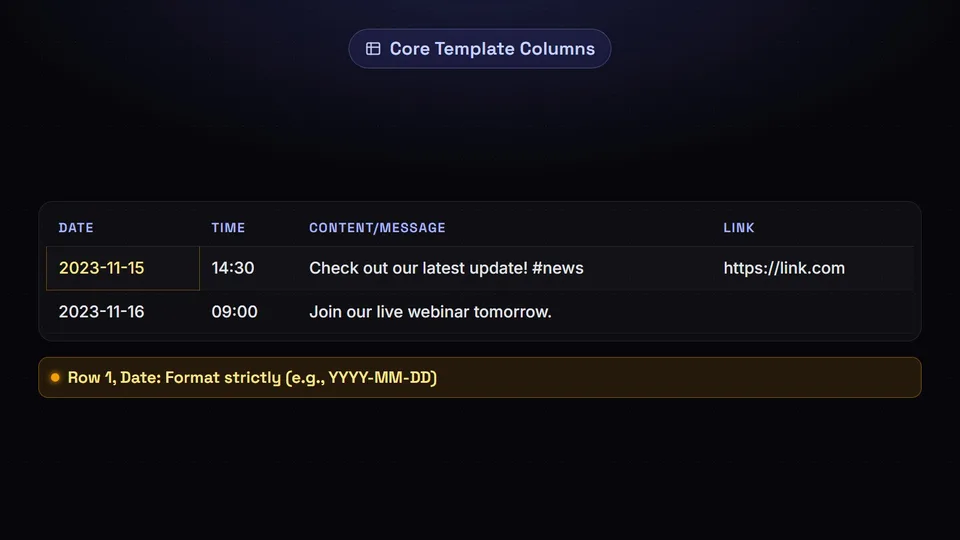
The foundation of a successful upload is the bulk import template. To bulk schedule posts csv effectively, your data must be mapped to the correct columns. SchedulifyX provides a standardised template designed to align perfectly with the platform's reading mechanisms.
Core Columns of the Template
When you open the bulk import template, you will typically find the following essential columns:
- Date: The specific day the post should go live. This must follow a strict format (usually YYYY-MM-DD or DD/MM/YYYY) to ensure the system does not confuse days and months.
- Time: The exact time of publication, generally formatted in 24-hour time (e.g., 14:30) to avoid AM/PM ambiguity.
- Content/Message: The actual text of your social media post. This can include your hashtags and mentions.
- Link (Optional): A URL that you want to attach to the post. The system will automatically parse this and generate a link preview on supported social networks.
Why Strict Adherence Matters
It can be tempting to add extra columns for your own internal tracking, such as 'Campaign Name' or 'Approval Status'. However, altering the template's structure can disrupt the parsing process. If the system expects column 'C' to be the post content, but it finds internal notes instead, the import will fail. Always maintain the exact column headers provided in the SchedulifyX template to ensure a seamless upload.
Step 2: The Preview Phase

Once you have filled out your template and uploaded the CSV file, the next crucial step is the preview phase. You should never blindly push an entire spreadsheet of content live without verifying how the platform has interpreted your data.
Visualising the Data
The preview interface in SchedulifyX takes the raw text from your CSV and renders it as it will appear on your social channels. This mechanism allows you to visually confirm that your bulk import social media strategy has been executed correctly. During the preview phase, you should look for:
- Formatting Retention: Ensure that your line breaks and paragraph spacing within the 'Content' column have been preserved.
- Link Generation: Verify that the URLs provided in the spreadsheet are generating the correct metadata and preview images.
- Chronological Accuracy: Check the scheduled dates and times. A common error in csv scheduling is a formatting mismatch that results in posts being scheduled for the wrong month or year.
The preview phase acts as your final safety net. It transforms abstract spreadsheet rows into tangible social media posts, allowing you to catch subtle formatting issues before they reach your audience.
Step 3: Fixing Rows In Place

Even with meticulous planning, errors can occur during a bulk upload. Perhaps a post exceeds a specific platform's character limit, a date is formatted incorrectly, or a required field was accidentally left blank. In traditional systems, a single error might force you to abort the entire upload, return to your spreadsheet, find the mistake, correct it, save the file, and upload it all over again.
SchedulifyX eliminates this repetitive cycle through its Fixing Rows In Place feature.
How In-Place Fixing Works
When you upload your CSV, SchedulifyX scans every row against the rules of your connected social media platforms. If it detects an anomaly, it flags the specific row directly within the preview interface. Instead of rejecting the entire file, the system highlights the exact nature of the error—for instance, noting that Row 14 contains 300 characters for a platform that only allows 280.
You can then click on the flagged row and edit the text, date, or link directly within the SchedulifyX dashboard. Once the correction is made, the system instantly re-validates the row. This mechanism allows you to resolve validation issues in real-time, preserving the momentum of your workflow and ensuring that your bulk schedule posts csv process remains highly efficient.
Best Practices for Bulk Import Social Media
To maximise the efficiency of your csv scheduling, consider adopting the following best practices before you even begin filling out your template:
- Use Plain Text Editors for Complex Formatting: If your posts require intricate spacing, draft them in a plain text editor before pasting them into your spreadsheet. This prevents word processors from adding invisible styling tags.
- Check Character Encoding: When saving your spreadsheet, ensure it is exported as a CSV with UTF-8 encoding. This guarantees that special characters, emojis, and specific currency symbols are preserved during the upload.
- Batch Your Campaigns: Instead of uploading an entire year's worth of content in one massive file, break your imports down into manageable monthly or campaign-specific batches. This makes the preview phase much easier to review and keeps your content agile.
Conclusion
Mastering the ability to bulk schedule posts csv is a fundamental skill for any serious social media manager. By understanding the importance of a clean CSV file, strictly adhering to the provided template, and diligently reviewing your content during the preview phase, you can manage large-scale content calendars with precision.
Furthermore, by utilising the Fixing Rows In Place feature, you can handle inevitable formatting errors swiftly without disrupting your entire workflow. This streamlined approach to bulk import social media ensures that your focus remains on crafting excellent content, rather than fighting with spreadsheet uploads. Navigate to your SchedulifyX dashboard today, download the template, and experience the efficiency of seamless bulk scheduling.