Migrate From Hootsuite or Buffer to SchedulifyX in 15 Mins
SchedulifyX Team · August 28, 2026
Learn how to migrate from Hootsuite or switch from Buffer to SchedulifyX in under 15 minutes. Preserve your data, import posts, and onboard your team easily.
In the fast-paced world of digital marketing, the tools you use can either be your greatest asset or your biggest bottleneck. If you are reading this, chances are you have realized that your current social media management platform is no longer serving your needs. Whether you are dealing with sudden price hikes, a clunky user interface, or a lack of modern AI capabilities, deciding to migrate from Hootsuite or switch from Buffer is a significant step toward modernizing your workflow.
Many social media managers and agency owners dread the idea of a social media tool migration. The fear of losing historical data, dropping scheduled posts, or facing a steep learning curve during team onboarding often keeps teams tethered to outdated platforms. But what if you could complete a full Hootsuite alternative migration in less time than it takes to drink your morning coffee?
Welcome to the ultimate guide on switching to SchedulifyX. In this comprehensive, step-by-step tutorial, we will walk you through the entire process of migrating your accounts, preserving your data, importing your content calendar, and mastering SchedulifyX onboarding—all in under 15 minutes.
Why It Is Time for a Social Media Tool Migration
Before diving into the technical steps of the migration, it is crucial to understand why thousands of brands and agencies are actively seeking a Hootsuite alternative migration or deciding to switch from Buffer. The landscape of social media has evolved drastically over the last few years, but legacy tools have often struggled to keep pace.
The Rising Costs of Legacy Platforms
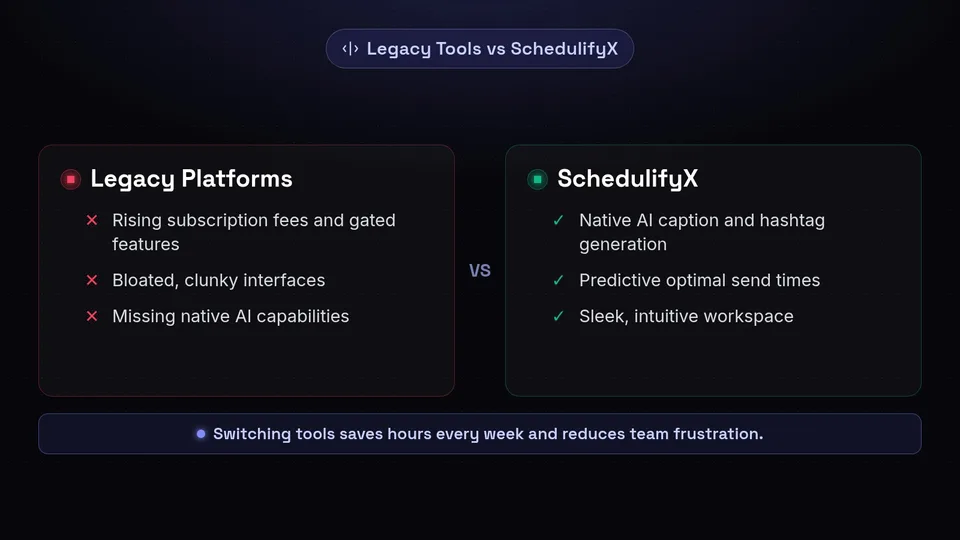
One of the primary reasons users migrate from Hootsuite is the shifting pricing structure. Over recent years, many legacy platforms have increased their subscription fees while simultaneously gating essential features behind higher-tier enterprise plans. For small to medium-sized businesses and growing agencies, these costs can quickly eat into marketing budgets, leaving less capital for actual ad spend or content creation.
The Need for Native AI Integration
We are firmly in the era of artificial intelligence. If your social media scheduler is just a calendar, you are missing out on massive productivity gains. When you switch from Buffer to an AI-powered platform like SchedulifyX, you aren't just getting a scheduling tool; you are getting an intelligent assistant. SchedulifyX offers native AI caption generation, predictive optimal send times, and automated hashtag research—features that legacy tools often lack or only offer through clunky third-party integrations.
Streamlined User Experience
"The best software is the one your team actually wants to use. A clunky interface leads to missed posts, reporting errors, and team frustration."
Many users report that legacy platforms suffer from bloated interfaces. A successful social media tool migration to SchedulifyX brings you into a sleek, intuitive, and modern workspace designed specifically to reduce friction and save your team hours every week.
Pre-Migration Checklist: Preparing Your Assets
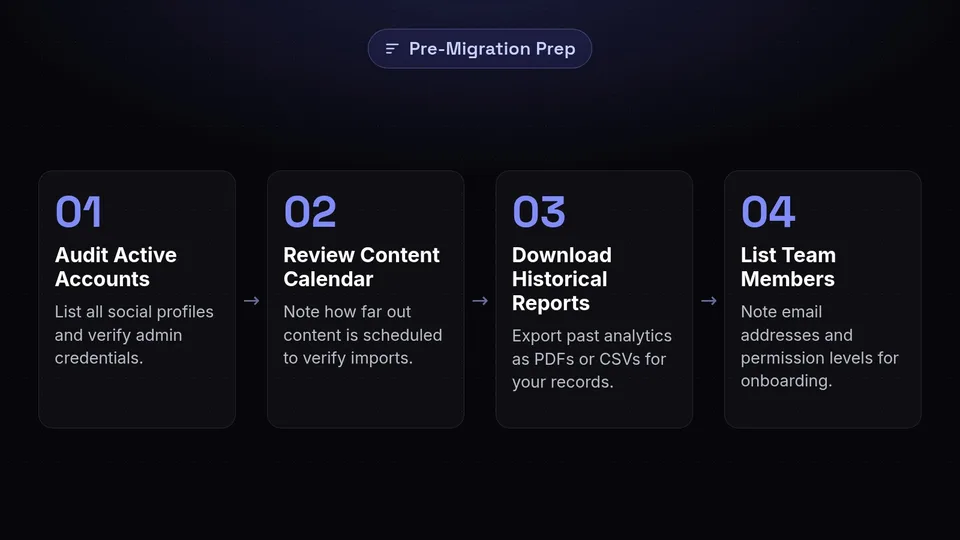
To ensure you can migrate from Hootsuite or Buffer in under 15 minutes, a little bit of prep work goes a long way. Before you cancel your old subscriptions, run through this quick checklist.
- Audit Your Active Social Accounts: Make a list of every Facebook Page, Instagram Business Account, X (Twitter) profile, LinkedIn Company Page, TikTok account, and Pinterest board you currently manage. Ensure you have the admin login credentials for each native platform.
- Review Your Content Calendar: Take note of how far out your content is scheduled in your current tool. Are you scheduled out for a week? A month? This will help you verify that all posts have transferred correctly during the import phase.
- Download Historical Reports: While SchedulifyX will begin pulling in data the moment you connect your accounts, it cannot retroactively pull years of proprietary analytics generated by Hootsuite or Buffer. Export your historical reports as PDFs or CSVs for your records.
- List Your Team Members: Note down the email addresses and current permission levels of every team member who needs access to the new platform. This will speed up your SchedulifyX onboarding process.
Step 1: Creating Your SchedulifyX Workspace

The first official step in your Hootsuite alternative migration is setting up your new digital home. SchedulifyX has optimized this process to take less than two minutes.
Signing Up and Initial Configuration
Head over to the SchedulifyX homepage and click on the 'Start Free Trial' or 'Sign Up' button. You will be prompted to enter your basic information. Once your email is verified, you will enter the initial SchedulifyX onboarding flow.
Setting Up Your Workspace
In SchedulifyX, a 'Workspace' is a dedicated environment for a specific brand or client. If you are an agency, you will want to create a separate Workspace for each client. If you are an in-house marketer, one Workspace is likely all you need.
- Name your Workspace: Use your brand or client name.
- Set your Timezone: This is a critical step. Ensure the timezone matches your primary audience's location, as this will dictate how your imported scheduled posts are published.
- Upload a Logo: (Optional but recommended) Uploading a brand logo helps keep your dashboard organized, especially if you manage multiple Workspaces.
Step 2: Reconnecting Your Social Media Profiles

Now that your Workspace is ready, it is time to connect your social media channels. This is often the part of a social media tool migration that people dread, but thanks to secure OAuth integrations, it is incredibly straightforward.
The Reconnection Process
Navigate to the 'Social Accounts' tab in your SchedulifyX dashboard. You will see a grid of supported platforms. Click on the icon for the first network you want to connect (e.g., Facebook).
You will be redirected to the native platform (e.g., Facebook.com) and asked to grant SchedulifyX permission to publish on your behalf. Important: Always ensure you grant all requested permissions. Deselecting permissions during this step is the number one cause of failed posts later on.
Handling Instagram and Facebook Specifics
When you migrate from Hootsuite, you might remember the complex setup for Instagram direct publishing. SchedulifyX simplifies this. Ensure your Instagram account is set to a 'Professional' or 'Creator' account and is linked to a Facebook Page where you hold Admin access. Connecting the Facebook Page will automatically allow you to route your Instagram connection alongside it.
Connecting X (Twitter), LinkedIn, and Others
Repeat the secure login process for X, LinkedIn, TikTok, and Pinterest. Because SchedulifyX uses official API partnerships with all these networks, your connections will be stable, secure, and compliant with all platform guidelines. This entire reconnection phase should take no more than 5 minutes.
Step 3: Exporting and Importing Your Scheduled Posts
This is the most critical phase of your Hootsuite alternative migration. You do not want to lose the dozens (or hundreds) of posts you have already meticulously crafted and scheduled.
Exporting from Hootsuite or Buffer
First, log into your legacy tool.
- If you migrate from Hootsuite: Navigate to your Publisher, select the list view of your scheduled messages, and look for the 'Export' option. Choose to export your scheduled messages as a CSV file.
- If you switch from Buffer: Buffer does not have a native bulk export for scheduled posts in all plans. If you are on a plan that supports it, export your queue. If not, you may need to use a simple copy-paste method into a spreadsheet if your queue is small, or reach out to Buffer support for an account data export.
Formatting Your CSV for SchedulifyX
SchedulifyX provides a handy CSV template in the 'Bulk Import' section of the dashboard. Open your exported file and ensure the columns match SchedulifyX's required format. Typically, you will need the following columns:
- Date: (Format: YYYY-MM-DD)
- Time: (Format: HH:MM in 24-hour time)
- Content/Caption: The text of your post.
- Link: Any URL you are sharing.
- Media URL: The direct link to the image or video (if applicable).
Executing the Bulk Import
Once your CSV is formatted, go to the 'Publishing' tab in SchedulifyX and click 'Bulk Import'. Upload your CSV file. The system will automatically parse your data and present a preview of your imported posts.
Review the first few posts to ensure the dates, times, and media attachments look correct. If everything is accurate, click 'Confirm Import'. Within seconds, your entire content calendar will populate in SchedulifyX. Migration time elapsed: roughly 10 minutes.
Step 4: Team Member Onboarding and Permissions
A tool is only as good as the team using it. Effective SchedulifyX onboarding for your team ensures a smooth transition without interrupting your marketing operations.
Inviting Your Team
Navigate to 'Workspace Settings' and select 'Team Members'. Click 'Invite Member' and enter the email addresses you gathered during your pre-migration checklist.
Assigning Roles and Permissions
SchedulifyX offers granular role-based access control, which is a major upgrade for many who switch from Buffer's simpler permission models. You can assign the following roles:
- Admin: Full access to billing, workspace settings, social account connections, and publishing.
- Editor: Can create, edit, and schedule posts, as well as view analytics, but cannot change workspace settings.
- Contributor: Can draft posts that require approval from an Editor or Admin before they are scheduled. Ideal for junior staff or external copywriters.
- Viewer: Read-only access to the calendar and analytics. Perfect for clients or upper management who want to monitor progress without risking accidental changes.
Streamlining SchedulifyX Onboarding
To speed up adoption, encourage your team to utilize the SchedulifyX Academy—a built-in library of two-minute video tutorials covering everything from using the AI caption writer to generating custom analytics reports. Because the UI is highly intuitive, most social media professionals feel completely comfortable within their first hour of use.
Step 5: Preserving Historical Data and Analytics
Data preservation is a major concern during any social media tool migration. While you cannot import your old Hootsuite analytics dashboards directly into SchedulifyX, you can ensure a seamless transition of data tracking.
Establishing the Baseline
Remember those PDF and CSV reports you downloaded in the pre-migration checklist? Store those in a shared Google Drive or Dropbox folder labeled 'Legacy Social Data'. This will serve as your historical baseline.
Activating SchedulifyX Analytics
The moment you connect your social profiles in Step 2, SchedulifyX automatically begins pulling in data directly from the native platforms' APIs. This includes follower growth, engagement rates, impressions, and click-through rates.
Navigate to the 'Analytics' tab and set up your custom dashboard. You can drag and drop widgets to display the metrics that matter most to your KPIs. Because SchedulifyX pulls data directly from the networks, you will immediately see up to 30 days of historical data (depending on the specific network's API limits) right out of the gate, bridging the gap between your old tool and your new one.
Exploring SchedulifyX AI-Powered Features
Congratulations! You have successfully completed your Hootsuite alternative migration. You are now fully set up on SchedulifyX. But the real magic happens when you start leveraging the platform's advanced capabilities.
AI Content Generation
Staring at a blank screen is a thing of the past. SchedulifyX features a native AI writing assistant tuned specifically for social media engagement. Simply input a prompt like, 'Write an engaging LinkedIn post about our new product launch, focusing on B2B efficiency,' and the AI will generate multiple variations complete with appropriate emojis and formatting.
Predictive Optimal Send Times
Stop guessing when your audience is online. SchedulifyX analyzes your past account performance and audience behavior to recommend the exact minute you should publish your post for maximum reach and engagement.
Automated Hashtag Strategy
Instead of manually researching hashtags, SchedulifyX scans your image and caption, cross-references current trending topics, and suggests a mix of broad and niche hashtags designed to optimize your discoverability.
Troubleshooting Common Migration Issues
Even the smoothest social media tool migration can occasionally hit a snag. Here are the most common issues users face when they migrate from Hootsuite or switch from Buffer, and how to fix them instantly.
Issue 1: Disconnected Social Accounts
Symptom: A social account shows an 'Error' or 'Disconnected' badge shortly after setup.
Solution: This usually happens if you recently changed your password on the native platform or if the platform (like Facebook) flagged the new connection as a security measure. Simply click 'Reconnect' in SchedulifyX and log in again to refresh the access token.
Issue 2: CSV Import Errors
Symptom: The bulk import tool rejects your file or maps the data incorrectly.
Solution: Double-check your date and time formatting. Excel and Google Sheets often auto-format dates in ways that break CSV structures. Ensure your date column is strictly formatted as YYYY-MM-DD. Also, verify that your media URLs are publicly accessible links (not local file paths like C:/Images/photo.jpg).
Issue 3: Missing Instagram Features
Symptom: Cannot schedule Stories or Carousel posts.
Solution: Ensure your Instagram is fully converted to a Business account and properly linked to a published Facebook Page. Personal Instagram accounts have severe API limitations imposed by Meta.
Conclusion: Embrace the Future of Social Media Management
Choosing to migrate from Hootsuite or switch from Buffer doesn't have to be a multi-day ordeal filled with lost data and frustrated team members. As we have outlined in this guide, a complete Hootsuite alternative migration to SchedulifyX can be executed in under 15 minutes.
By auditing your assets, quickly setting up your workspace, utilizing bulk CSV imports, and rolling out streamlined SchedulifyX onboarding for your team, you are positioning your brand to take advantage of the next generation of AI-powered social media tools. You are no longer just scheduling posts; you are optimizing your entire digital strategy.
Ready to experience the difference for yourself? Stop overpaying for legacy tools that hold your team back. Start your free trial of SchedulifyX today and complete your social media tool migration before your next meeting!