SchedulifyX Integrations: Slack & ClickUp Workflow Guide
SchedulifyX Team · July 27, 2026
Learn how to build a seamless social media pipeline by integrating SchedulifyX with Slack, ClickUp, and other tools for ultimate workflow automation.
The Importance of Social Media Tool Integration

In the fast-paced world of digital marketing, managing social media is no longer a single-platform endeavor. It requires a symphony of ideation, asset creation, approval routing, scheduling, and community management. For many marketing teams, this symphony often devolves into a cacophony of disconnected tools, lost files, and missed deadlines. This is where the power of social media tool integration comes into play.
When your tools do not communicate with one another, your team is forced to act as the bridge. This manual data entry and constant context-switching—moving from a project management tool to an email thread, then to a scheduling platform—drains productivity. According to recent studies, employees lose up to 20% of their productive time simply switching between applications and searching for information across siloed platforms.
By implementing robust workflow automation, you can eliminate these bottlenecks. Integrating your core platforms ensures that data flows seamlessly from the initial spark of an idea all the way to the final published post. SchedulifyX integrations are designed specifically to bridge these gaps, transforming your marketing operations from a series of fragmented tasks into a unified, well-oiled machine.
"Automation is not about replacing human creativity; it is about removing the administrative burden so that human creativity can truly flourish."
In this comprehensive tutorial, we will explore how to connect SchedulifyX with industry-leading tools like ClickUp and Slack. We will guide you through building an end-to-end content pipeline that handles ideation, task management, scheduling, and team notifications without breaking a sweat.
Building Your Content Pipeline: The Core Tools
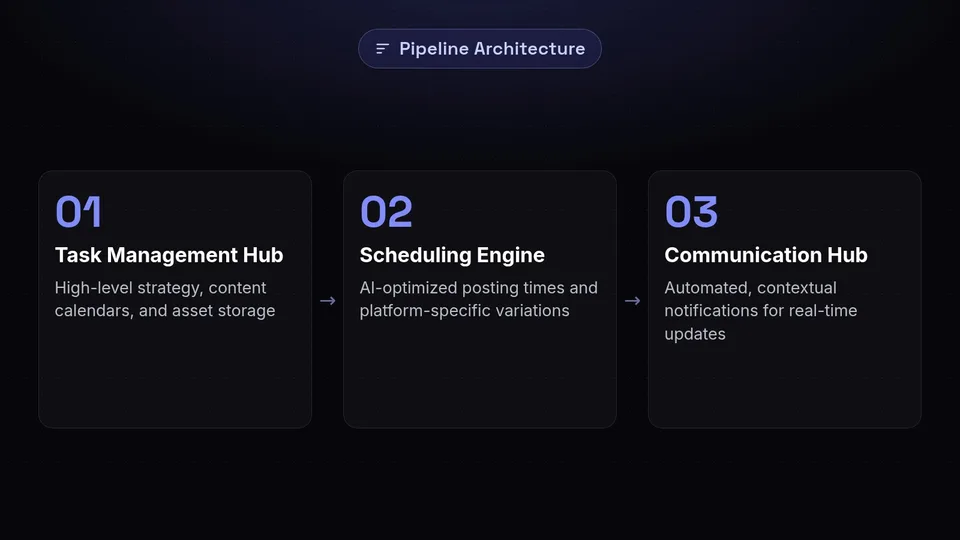
Before we dive into the technical setup, it is crucial to understand the architecture of a modern social media pipeline. A highly efficient pipeline typically relies on three foundational pillars: a task manager, a scheduling engine, and a communication hub. Let us break down the roles of the tools we will be integrating today.
1. ClickUp: The Ideation and Task Management Hub
ClickUp serves as the brain of your operation. This is where high-level strategy is broken down into actionable tasks. A ClickUp social media workflow allows you to track content calendars, assign design requests, manage copywriting stages, and store essential assets. Because of its highly customizable hierarchy (Spaces, Folders, Lists, and Tasks) and custom fields, ClickUp is the perfect starting point for your content's journey.
2. SchedulifyX: The AI-Powered Scheduling Engine
Once a piece of content is written, designed, and approved in ClickUp, it needs a vehicle to reach your audience. SchedulifyX is that vehicle. Beyond simple scheduling, SchedulifyX uses AI to optimize posting times, generate platform-specific variations, and analyze performance. Through SchedulifyX integrations, the platform can automatically pull approved content from ClickUp, format it, and place it directly into your publishing queue.
3. Slack: The Communication and Notification Nervous System
Even with the best planning and scheduling tools, real-time communication remains vital. A Slack social media integration acts as the nervous system of your pipeline. Instead of requiring managers to constantly refresh SchedulifyX to see if a post went live, or checking ClickUp to see if a draft is ready for review, Slack delivers automated, contextual notifications directly to the channels where your team already works.
Step-by-Step: ClickUp Social Media Integration
Integrating ClickUp with SchedulifyX allows you to automatically turn completed tasks into scheduled social media posts. This eliminates the need to copy and paste captions, download and re-upload images, and manually set dates. Here is how to set up a flawless ClickUp social media pipeline.
Step 1: Structuring Your ClickUp Workspace
For the integration to work smoothly, your ClickUp workspace must be highly structured. We recommend creating a dedicated Space for "Marketing" and a Folder specifically for "Social Media Management." Inside this Folder, create a List called "Content Calendar."
Next, you need to establish Custom Fields in ClickUp that map directly to the fields required by SchedulifyX. Create the following Custom Fields:
- Platform (Dropdown): Options should include LinkedIn, Twitter/X, Facebook, Instagram, TikTok, etc.
- Post Date (Date): The exact date and time the post should go live.
- Caption (Long Text): The primary copy for the post.
- Media URL (Website/URL): A link to the Google Drive or Dropbox file containing the image or video.
- Approval Status (Dropdown): Options like Drafting, In Review, Needs Edits, Approved.
Step 2: Connecting ClickUp to SchedulifyX
With your workspace structured, it is time to connect the two platforms. Log into your SchedulifyX dashboard and navigate to the Integrations tab. Locate the ClickUp icon and click Connect.
You will be prompted to log into your ClickUp account and authorize SchedulifyX to access your workspace. Once authorized, you must select the specific Space, Folder, and List (your "Content Calendar" List) that SchedulifyX should monitor.
Step 3: Mapping Fields and Setting Triggers
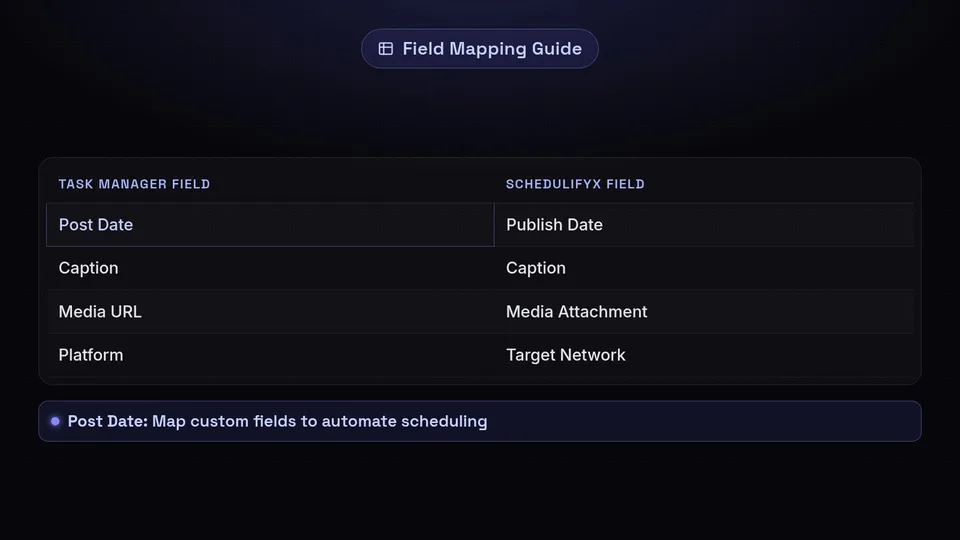
The magic of workflow automation happens in the mapping phase. SchedulifyX needs to know which ClickUp field corresponds to which scheduling parameter.
In the SchedulifyX integration setup, map the fields as follows:
- Map the SchedulifyX Publish Date to your ClickUp Post Date field.
- Map the SchedulifyX Caption to your ClickUp Caption field.
- Map the SchedulifyX Media Attachment to your ClickUp Media URL field.
- Map the SchedulifyX Target Network to your ClickUp Platform field.
Finally, set the automation trigger. You want to ensure that only finished content is sent to SchedulifyX. Configure the trigger so that SchedulifyX only imports the task when the ClickUp Approval Status custom field is changed to "Approved". Once this happens, SchedulifyX will instantly draft the post and place it in your queue for the specified date and time.
Step-by-Step: Slack Social Media Notifications
Now that content is flowing automatically from ClickUp to SchedulifyX, you need to keep your team informed. Implementing a Slack social media integration ensures that stakeholders are notified of important events without having to monitor the scheduling platform manually.
Step 1: Creating Dedicated Slack Channels
To prevent notification fatigue, avoid sending automated alerts to general team channels. Instead, create specific channels dedicated to social media operations. We recommend creating two distinct channels:
- #social-media-alerts: For critical notifications such as failed posts, API disconnections, or mentions requiring immediate response.
- #social-media-stream: For a running feed of successfully published posts and weekly analytics summaries.
Step 2: Connecting SchedulifyX to Slack
Navigate back to the Integrations tab in your SchedulifyX dashboard. Find the Slack integration and click Connect. You will be redirected to Slack's authorization page. Select your workspace and grant SchedulifyX the necessary permissions to post messages in your channels.
Step 3: Configuring Notification Triggers
Once connected, you can customize exactly what events trigger a Slack message and which channel receives them. Within SchedulifyX, set up the following notification rules:
Trigger 1: Post Published Successfully
Route this notification to #social-media-stream. Customize the message to include the platform, a snippet of the caption, and a direct link to the live post. This allows the team to easily click through and engage with the content immediately after it goes live, boosting early algorithmic traction.
Trigger 2: Post Failed to Publish
Route this notification to #social-media-alerts. Make sure the message tags the relevant social media manager (e.g., @social-lead). The alert should include the error code (such as an expired token or image size limit) so the issue can be resolved quickly.
Trigger 3: Approval Required
If you use SchedulifyX's internal approval workflows in addition to ClickUp, you can set a trigger that notifies a manager in Slack when a post is waiting for final sign-off. You can even enable interactive Slack buttons that allow the manager to click "Approve" or "Reject" directly within the Slack interface, further streamlining the workflow.
Expanding Your Ecosystem: Other Workflow Automation Tools
While ClickUp and Slack form a incredibly powerful core, true workflow automation extends beyond just three tools. By leveraging integration platforms and other native connections, you can build an even more robust ecosystem.
Integrating with Zapier and Make (Integromat)
If you use tools that do not have native SchedulifyX integrations, platforms like Zapier or Make can act as the middleware. These platforms use "If This Then That" logic to connect thousands of apps.
For example, you could set up a Zapier workflow that monitors a specific Google Drive folder. Whenever a designer uploads a new image into the "Final Social Assets" folder, Zapier can automatically create a new task in ClickUp, attach the image, and assign it to the copywriter. Once the copywriter finishes and marks it approved, the native integration takes over, sending it to SchedulifyX.
Connecting Canva for Seamless Design Handoffs
Visual content is the lifeblood of social media. SchedulifyX offers integrations with design tools like Canva. Instead of downloading heavy video files or high-resolution images to your local hard drive and re-uploading them to SchedulifyX, the Canva integration allows you to browse your Canva folders directly within the SchedulifyX media library. You can import assets with a single click, ensuring you are always using the most up-to-date version of a graphic.
CRM Integrations for Social Selling
For B2B companies, social media is a vital lead generation tool. By integrating SchedulifyX with CRMs like HubSpot or Salesforce, you can track how social media interactions translate into actual revenue. When a lead engages with a post published via SchedulifyX, that interaction can be logged in their CRM profile, giving your sales team valuable context before they make a discovery call.
Best Practices for Workflow Automation
Setting up the technology is only half the battle. To truly benefit from social media tool integration, your team must adhere to strict best practices. Automation amplifies whatever processes you currently have; if your processes are messy, automation will simply create messes faster.
1. Establish Strict Naming Conventions
When data is moving automatically between ClickUp, SchedulifyX, and Slack, clear naming conventions are non-negotiable. Standardize how you name campaigns, assets, and tasks. For example, use a format like [Platform] - [Campaign Name] - [Date] (e.g., LI - Q3 Product Launch - 08/15). This ensures that when an alert pops up in Slack, everyone instantly knows exactly which piece of content is being referenced.
2. Designate an Integration Owner
Workflow automation requires maintenance. APIs change, tokens expire, and custom fields occasionally get deleted by mistake. Designate one person on your marketing or RevOps team to be the "Integration Owner." This person is responsible for troubleshooting failed Zaps, reconnecting expired social media accounts in SchedulifyX, and auditing the pipeline quarterly to ensure it is still meeting the team's needs.
3. Build in Human Oversight
While the goal is to automate as much as possible, never automate the final quality check of your brand's public voice. The pipeline should automate the movement of data, but humans must still control the approval of data. Ensure that your ClickUp to SchedulifyX trigger absolutely requires a manual status change by a senior editor before anything is scheduled.
4. Document Your Standard Operating Procedures (SOPs)
Create a comprehensive SOP document that outlines exactly how the integrated pipeline works. This document should explain how to create a task in ClickUp so that it syncs properly, what to do if a Slack alert indicates a failed post, and how to use the Canva integration. A well-documented SOP makes onboarding new team members infinitely easier and prevents the pipeline from breaking due to user error.
Troubleshooting Common Integration Issues
Even the most meticulously designed automated workflows will occasionally encounter hiccups. Understanding how to diagnose and resolve these issues quickly is essential for maintaining a smooth content pipeline. Here are the most common challenges you might face with your SchedulifyX, ClickUp, and Slack integrations, along with actionable solutions.
1. The "Failed to Sync" Error Between ClickUp and SchedulifyX
One of the most frequent issues is a post failing to migrate from ClickUp to the SchedulifyX queue after being marked as "Approved." In 90% of cases, this is due to a missing or incorrectly formatted Custom Field.
- Check Date Formats: Ensure the date entered in ClickUp matches the format required by SchedulifyX. If your ClickUp field is set to "Text" instead of a strict "Date/Time" format, the API will reject it.
- Verify Media URLs: If you are passing a Google Drive link, ensure the link permissions are set to "Anyone with the link can view." If the link is restricted, SchedulifyX cannot download the media to attach it to the post.
- Character Limits: Different platforms have different text limits (e.g., Twitter's 280 characters). If your ClickUp caption exceeds the target platform's limit, SchedulifyX will block the import to prevent a failed publish.
2. Slack Notifications Not Firing
If your team is suddenly met with silence in the #social-media-alerts channel, the integration token may have expired, or channel permissions may have changed.
- Re-authenticate the App: Go to the SchedulifyX Integrations dashboard, disconnect Slack, and reconnect it. This refreshes the OAuth token.
- Check Channel Privacy: If a Slack administrator recently changed a public channel to private, the SchedulifyX bot may have been inadvertently kicked out. You will need to manually invite the SchedulifyX app back into the private channel using the
/invite @SchedulifyXcommand.
3. Duplicate Posts Appearing in the Queue
Occasionally, a workflow automation glitch might cause a single ClickUp task to generate two identical drafts in SchedulifyX. This usually happens when using third-party connectors like Zapier if the trigger logic is too broad.
- Refine Trigger Conditions: Ensure your trigger is set to fire only on a specific status change (e.g., "Status changes from 'In Review' to 'Approved'"), rather than just "Task Updated." If set to "Task Updated," any minor change (like fixing a typo in the caption after approval) will trigger the automation to run a second time.
Measuring Success with Your Integrated Pipeline
Implementing these SchedulifyX integrations requires an upfront investment of time and strategic planning. To justify this effort, you must measure the impact of your new workflow automation on your team's performance and overall marketing ROI.
Tracking Time Saved
The most immediate benefit of social media tool integration is time saved. Before implementing the pipeline, track how many hours per week your social media manager spends manually copying captions from documents, downloading images, and scheduling posts. After the integration has been running for a month, measure this time again. Teams utilizing the ClickUp and SchedulifyX pipeline typically report saving 5 to 10 hours per week—time that can now be reallocated to community engagement, strategy, and creative ideation.
Monitoring Content Volume and Consistency
A fragmented workflow often leads to inconsistent posting schedules. When the process is difficult, content volume drops. By removing the friction of scheduling, your team can produce and publish more content. Look at your SchedulifyX analytics to track the total number of posts published per month before and after the integration. You should see a steady increase in output without a corresponding increase in team burnout.
Evaluating Error Reduction
Manual data entry is prone to human error—posting the wrong image, forgetting a link, or publishing at 3:00 AM instead of 3:00 PM. Because the ClickUp integration pulls data exactly as it was approved, transcription errors are virtually eliminated. Use your Slack #social-media-alerts channel history to track the frequency of failed posts or required corrections over time. A successful integration will result in a sharp decline in these errors.
Conclusion: Unifying Your Social Media Strategy
The era of managing social media through endless tabs, scattered spreadsheets, and manual copy-pasting is over. By embracing workflow automation and leveraging powerful SchedulifyX integrations, you can build a content pipeline that is resilient, scalable, and highly efficient.
Connecting ClickUp to handle your complex ideation and task management ensures that every piece of content is thoroughly planned and perfectly crafted. Integrating Slack guarantees that your team remains in the loop, reacting to successes and resolving issues in real-time without ever leaving their primary communication hub. Together, these tools form a triad of productivity that empowers your marketing team to do what they do best: create engaging, impactful content.
Are you ready to stop managing tools and start managing strategy? Sign up for SchedulifyX today and explore our extensive library of native integrations. Build your automated ClickUp social media pipeline, set up your Slack social media alerts, and watch your team's productivity soar.